Tap 'n' Sniff
Author: Marco Lux, Mathis HagenDate: 2017-01-19 13:59:00
Content Table
| 1. Introduction |
| 2. Failsafe mode |
| 3. Installing Openwrt |
| 4. Configuring Openwrt |
| 5. Testing |
1. Introduction
The goal of this guide is to provide a reliable and fast way for creating a lan tap for red team assessments of networks. While this was our main target this tap is also quite helpful if you want to have a great device for your daily analysis of network attached computers. Before we started with our implementation we made a list of things which were mandatory. The hardware had to be small, have at least two lan ports and wifi, cheap and opensource included or available.
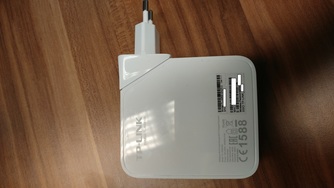
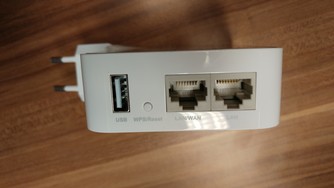
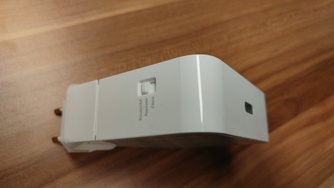
After some research we choose the TL-WR810N, a 20 euro Pocket Router which should be available in most electronic stores. It features two lan ports and a wifi card, which allows us to bridge the lan interfaces and create a hidden AP to connect to the device. It should be said that the device only supports Fastlan (100 Mbit/sec) and not Gigabit lan (1000 Mbit/sec) but at this size you can't be picky and it's quite difficult to find something better even online when ordering from a foreign country so there is that. After we are finished we want to be able to listen to the network traffic between the taped sources, manipulate packets or directly pivot into the network. For our setup we are going to use openwrt instead of the default TP-Link firmware. We are currently working on creating an image that will make the configuration of openwrt obsolete so stay tuned for info regarding this. And this is how it actually looks:


On the inside we find a SoC (System on Chip), namely the Qualcomm Atheros QCA9533 which is capable of wireless ABGN communication and has a clock speed of 560 MHz according to wikidevi. There is also 64 MB of Ram and we can use 4.6 MB of flash storage with 1.1 still availiable after finishing this guide. Below is the output of cpuinfo, free and df. It is interesting that when we opened the device later on we actually found the cpu to be a different one, the Qualcom QCA9531-BL3A but apparently they are identical. Basic information found via commandline:
root@OpenWrt:~# cat /proc/cpuinfo system type : Qualcomm Atheros QCA9533 ver 2 rev 0 machine : TP-LINK TL-WR810N processor : 0 cpu model : MIPS 24Kc V7.4 BogoMIPS : 432.53 wait instruction : yes microsecond timers : yes tlb_entries : 16 extra interrupt vector : yes hardware watchpoint : yes, count: 4, address/irw mask: [0x0ffc, 0x0ffc, 0x0ffb, 0x0ffb] isa : mips1 mips2 mips32r1 mips32r2 ASEs implemented : mips16 shadow register sets : 1 kscratch registers : 0 package : 0 core : 0 VCED exceptions : not available VCEI exceptions : not available -------------------- root@OpenWrt:~# free total used free shared buffers cached Mem: 60220 17032 43188 20 1504 4828 -/+ buffers/cache: 10700 49520 Swap: 0 0 0 -------------------- root@OpenWrt:~# df -h -T Filesystem Type Size Used Available Use% Mounted on /dev/root squashfs 2.0M 2.0M 0 100% /rom tmpfs tmpfs 29.4M 20.0K 29.4M 0% /tmp /dev/mtdblock3 jffs2 4.6M 3.5M 1.1M 76% /overlay overlayfs:/overlay overlay 4.6M 3.5M 1.1M 76% / tmpfs tmpfs 512.0K 0 512.0K 0% /dev
2. Failsafe mode
Before we begin you should know about the built-in failsafe mode of openwrt. This exists just in case you make a mistake and loose the connection to the router by something else than a reboot. It is activated by pressing the reset button rapidly on startup till the led blinks more frequently than usual. Now you have to give your ethernet interface an ip like 192.168.1.2 and connect to the WAN/LAN port. Then you should be able to ssh to 192.168.1.1 as root without password. In the ssh session you can mount the filesystem with
mount_root
and reverse the changes that made your system fail. If the worst-case scenario happens and you have no clue why your system behaves abnormal, you can always reinstall openwrt. To do so, we copy our image via scp in the tmp directory of the router:scp /path/to/image/ root@192.168.1.1:/tmp
Now we use the sysupgrade command on the router to install the bin file:sysupgrade -n /tmp/binary
The -n flag means that we also erase all config files. Don't worry if you loose the connection, first the router will reboot and then you have to switch your lan cable to the lan port again.3. Installing Openwrt
Installing openwrt is as easy as it gets, you just have to configure the router, preferrably by connecting via lan, using its webinterface and download the respective firmware image from the Openwrt wiki. We used the EU Version 1.1, also availible at our github since we can't guarantee this procedure to work with other versions that might be published in the future. The easiest way to install openwrt is via the webinterface and its option Firmware-Upgrade. Íf, for whatever reason, this fails you can also install openwrt via the serial console or TFTP. A guide can be found at the wiki. After doing so, you will loose the connection to the router and will have to reconnect via an ethernet cable. Make sure to use the lan port on the router, not the lan/wan one.
4. Configurating Openwrt
Now the interesting part begins: To start we open a ssh session to 192.168.1.1, the default ip of openwrt. The first thing we do is setting a password with passwd. Ideally we also connect the router to the internet via the other ethernet port afterwards and run
opkg update
to get our system up to date. We also want to install tcpdump, python-light (python is to big) and the normal netcat because the netcat provided by busybox can't run in server mode. Make sure to remove wpad-mini before installing hostapd or you will get an error when installing hostapd. If you do get the error, do not worry, just remove wpad-mini and install hostapd again.We do all this by running:
opkg remove wpa-mini and opkg install tcpdump python-light hostapd netcat
Secondly we disable a number of services normally ran at boot to reduce unneccessarity or possible traffic or because they would interfere with our scripts. To be more precisely, we disable firewall, led, network and odhcpd with these commands:
/etc/init.d/firewall disable /etc/init.d/led disable /etc/init.d/network disable /etc/init.d/odhcpd disable
To maintain access to the router we have to set up our AP because since we just placed it somewhere between interesting devices we can't access the router via lan. To do so we write a hostapd.conf like this:
vim /etc/config/hostapd.conf interface=wlan0 ssid=sniffntap hw_mode=g wpa=2 wpa_passphrase=networksniffer wpa_key_mgmt=WPA-PSK ignore_broadcast_ssid=1
Now we write a script which will run hostapd on startup, tells dropbear to listen on the wifi interface for ssh and bridges the two lan interfaces. So, our actual sniffer.
vim /etc/init.d/sniffer #!/bin/sh /etc/rc.common START=99 #tells openwrt in which order the scripts in /etc/init.d/ are to be started, 99 is per default the last entry STOP=99 #same as start but stop start() { echo start fconfig wlan0 up #the wifi is not activated by default ifconfig wlan0 192.168.2.1 #since we disabled dhcp we have to give our interface an IP manually ifconfig eth0 up #we need to bring our lan interfaces up manually since we disabled network ifconfig eth1 up brctl addbr br0 #create a new bridge interface ifconfig br0 up #bring our new bridge interface up brctl addif br0 eth0 #add interface eth0 to bridge br0 brctl addif br0 eth1 #add interface eth1 to bridge br0 dropbear -p 192.168.2.1:22 #tell dropbear to listen on the wifi interface on port 22 for incoming ssh connections hostapd /etc/config/hostapd.conf #start our AP } stop() { echo stop ifconfig wlan0 down #take our wifi interface down killall hostapd #stop hostapd }
Last but not least, make it executable and tell openwrt to run it at boot:
chmod +x /etc/init.d/sniffer /etc/init.d/sniffer enable
5. Testing
To test our configuration just reboot, connect to the wifi network and ssh to 192.168.2.1 in order to log in with your previously set password. In order to check if everything went as it should you can run ifconfig to check if all inerfaces are up and brctl show to check your bridge. You should see something like this:
root@OpenWrt:~# ifconfig br0 Link encap:Ethernet HWaddr 98:DE:D0:23:42:42 inet6 addr: fe80::709f:78ff:fec9:cd43/64 Scope:Link UP BROADCAST RUNNING MULTICAST MTU:1500 Metric:1 RX packets:752 errors:0 dropped:0 overruns:0 frame:0 TX packets:5 errors:0 dropped:0 overruns:0 carrier:0 collisions:0 txqueuelen:1000 RX bytes:38624 (37.7 KiB) TX bytes:518 (518.0 B) eth0 Link encap:Ethernet HWaddr 98:DE:D0:23:42:43 inet6 addr: fe80::9ade:d0ff:fe20:9bd7/64 Scope:Link UP BROADCAST RUNNING MULTICAST MTU:1500 Metric:1 RX packets:762 errors:0 dropped:0 overruns:0 frame:0 TX packets:12 errors:0 dropped:0 overruns:0 carrier:0 collisions:0 txqueuelen:1000 RX bytes:50678 (49.4 KiB) TX bytes:1276 (1.2 KiB) Interrupt:4 eth1 Link encap:Ethernet HWaddr 98:DE:D0:23:42:42 UP BROADCAST MULTICAST MTU:1500 Metric:1 RX packets:0 errors:0 dropped:0 overruns:0 frame:0 TX packets:0 errors:0 dropped:0 overruns:0 carrier:0 collisions:0 txqueuelen:1000 RX bytes:0 (0.0 B) TX bytes:0 (0.0 B) Interrupt:5 wlan0 Link encap:Ethernet HWaddr 98:DE:D0:23:42:44 inet addr:192.168.2.1 Bcast:192.168.2.255 Mask:255.255.255.0 inet6 addr: fe80::9ade:d0ff:fe20:9bd6/64 Scope:Link UP BROADCAST RUNNING MULTICAST MTU:1500 Metric:1 RX packets:140 errors:0 dropped:0 overruns:0 frame:0 TX packets:127 errors:0 dropped:0 overruns:0 carrier:0 collisions:0 txqueuelen:1000 RX bytes:17691 (17.2 KiB) TX bytes:18844 (18.4 KiB) -------------------- root@OpenWrt:~# brctl show bridge name bridge id STP enabled interfaces br0 8000.98ded0234242 no eth0 eth1
After ensuring that the bridge does work we can test our device by placing it between two devices. Now, the last question we have to answer is how to capture and store the traffic on a device with so small storage. And the Answer is: we don't. In the screenshots below you can see that we pipe the output of tcpdump on our remote Device to wireshark on our local device.
On our local machine we use mkfifo and tell wireshark to listen there:

And on our remote machine we run tcpdump (for copy pasters: ssh root@192.168.2.1 "tcpdump -U -s0 -w - -i br0 'port not 22'" > /tmp/sharkfin):

If you plan on monitoring networks with a lot of traffic consider to give tcpdump more filters to reduce load on the remote machine.
With this we conclude this article and wish you all happy hacking!


